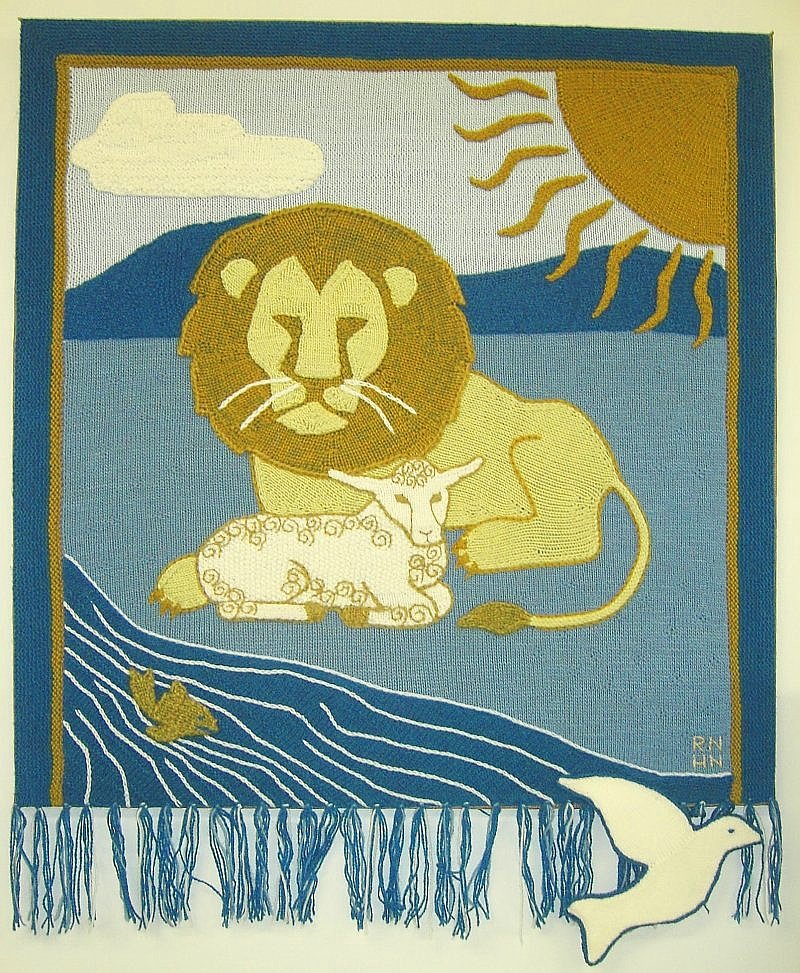
by Heather and Rebecca Nelson
INTRODUCTION
We recently collaborated to knit a tapestry inspired by a conference logo. We would like to tell the story of how we made the tapestry and inspire and encourage other “ordinary” knitters to try making knitted art. Knitters in artistic pursuits often get less attention than weavers or other fiber artists, and as a result, many knitters have an artistic inferiority complex. This is strange, because knitting as a medium is uniquely suited to creating fine art. Knitting is flexible and can be used to create flowing, curvaceous shapes or rigid, geometric lines. Knitting is beautifully textured, with an array of yarns from smooth and silky to fluffy or metallic and a wide range of different stitches; even changes in the direction of plain stockinette stitch create subtle texture. Knitting can be two-dimensional or three-dimensional, and can also make subtle or bold color effects.
Elizabeth Zimmerman helped many knitters free themselves from the need to follow patterns; knitting a tapestry helped us to free ourselves from the need to make garments or household accessories. Knitting a tapestry is no harder than knitting a sweater or a sock; the process can be freeing and can help your creative boundaries and self-confidence grow. As “ordinary” knitters, we used our garment shaping skills to create free-form shapes which we appliquéd onto a background.
INSPIRATION
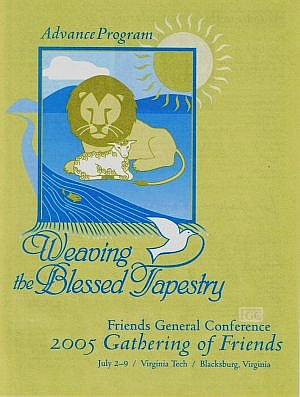 The
design for this tapestry came from a logo for the 2005 Friends
General Conference Gathering. We chose the design because it had a
meaningful subject, strong, simple shapes, and a limited color
palette. A design with a rainbow of blended colors and a myriad of
fine lines and small pieces might not be suitable for knitting a
tapestry. After we got the idea to knit the tapestry, we discussed
how we would knit it, drawing arrows on the logo to indicate the
direction of the knitting. We put a lot of thought into each piece,
considering different techniques and often arguing over which would
be best. This planning paid off, because we were able to knit most
pieces without ripping them back.
The
design for this tapestry came from a logo for the 2005 Friends
General Conference Gathering. We chose the design because it had a
meaningful subject, strong, simple shapes, and a limited color
palette. A design with a rainbow of blended colors and a myriad of
fine lines and small pieces might not be suitable for knitting a
tapestry. After we got the idea to knit the tapestry, we discussed
how we would knit it, drawing arrows on the logo to indicate the
direction of the knitting. We put a lot of thought into each piece,
considering different techniques and often arguing over which would
be best. This planning paid off, because we were able to knit most
pieces without ripping them back.
YARNS
We spent at least an hour in two different yarn shops choosing the right yarns. Above all, we wanted yarns that closely matched the logo's colors. We also wanted yarns that were fine and flexible enough to accurately reproduce the pieces of the logo, yarns that could be stretched and blocked into shape. We ended up with mostly wool yarns, with one alpaca and one cotton yarn because they matched the logo's unusual colors well. The natural fibers of these yarns enriched the finished piece, adding another dimension of visual and tactile texture and recalling the history of the craft in the tapestry.
DESIGN AND CONSTRUCTION
Before knitting, we made a full-size “cartoon” (in the sense of the Renaissance mural-makers, not the Sunday morning funnies) of the tapestry with outlines of each of the shapes we would be knitting. We did this by measuring points on the logo, using a ratio of 1:7 to enlarge them, and connecting the dots, but using a projector to enlarge the image and tracing it would work equally well. We used this cartoon as the basis for each of our knitted shapes. As we knit, we held the pieces against the cartoon and decided to increase, decrease, or continue knitting straight in order to stay within the lines.
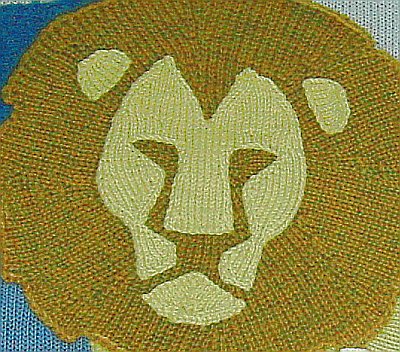 We
approached each piece like the garments they reminded us of, casting
on in the center of the lion's mane and shaping it like a circular
shawl, working the dove's tail with short rows like a sock, mitering
the border like a modular square. The complex shaping in the lion's
head gave us the most trouble. Unlike the other pieces, we were
unable to visualize the cast-on and knitting direction for this
shape. In the end, we worked the lion's head in two directions,
picking up a cast-on edge under each eye. We used a wealth of
knitting knowledge garnered from knitting magazines, books, and years
of making sweaters, hats, and mittens. We kept the texture minimal,
using only knit and purl patterns, and the pieces flat for easy
assembly, because this was our first tapestry. We knit the
stockinette stitch background with sprinklings of purls by hand,
although we sometimes wished for a knitting machine to speed the
process along.
We
approached each piece like the garments they reminded us of, casting
on in the center of the lion's mane and shaping it like a circular
shawl, working the dove's tail with short rows like a sock, mitering
the border like a modular square. The complex shaping in the lion's
head gave us the most trouble. Unlike the other pieces, we were
unable to visualize the cast-on and knitting direction for this
shape. In the end, we worked the lion's head in two directions,
picking up a cast-on edge under each eye. We used a wealth of
knitting knowledge garnered from knitting magazines, books, and years
of making sweaters, hats, and mittens. We kept the texture minimal,
using only knit and purl patterns, and the pieces flat for easy
assembly, because this was our first tapestry. We knit the
stockinette stitch background with sprinklings of purls by hand,
although we sometimes wished for a knitting machine to speed the
process along.
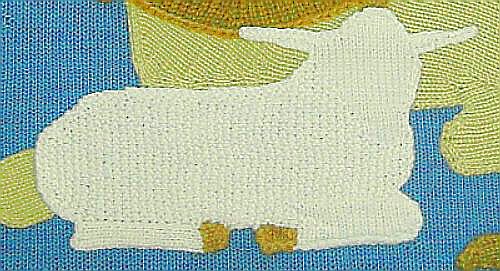
ASSEMBLY AND EMBELLISHMENT
After knitting all of the pieces of the tapestry, we went to the local hardware store (always an inspiring place for knitters) to buy a backing material. The man who helped us buy nylon window screening seemed a bit puzzled about how we intended to use it. We stretched the screen on a provisional wooden frame larger than our finished size so that we could sew the pieces up to the edge of the tapestry where they would overlap the frame. We ran white threads, which we later pulled out, to mark the dimensions of the tapestry on the window screen. Then we used sewing thread in matching colors to whipstitch the background and each piece of the tapestry to the screen.
 When
we had tacked the knitting to the screen, we embroidered some
finishing details on the tapestry with the yarns we used to knit it.
We used only a few simple stitches with dramatic effects: chain
stitch and split stitch for the outlines and whiskers, St. George
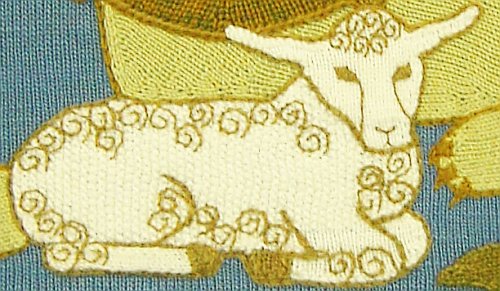
cross stitch for the fish's eye, satin stitch for the lamb's eyes,
and lazy daisy stitch for the lamb's nose. The lamb's nose needed to
be finer than the rest of the embroidery, so after much trial and
error we used multiple strands of the matching sewing thread to
stitch the nose instead of yarn. After finishing the embroidery on
the tapestry, we took the window screen off of the original wooden
frame and wrapped it around a piece of sturdy, thin plywood, tacking
it in place with a staple gun.
When
we had tacked the knitting to the screen, we embroidered some
finishing details on the tapestry with the yarns we used to knit it.
We used only a few simple stitches with dramatic effects: chain
stitch and split stitch for the outlines and whiskers, St. George
cross stitch for the fish's eye, satin stitch for the lamb's eyes,
and lazy daisy stitch for the lamb's nose. The lamb's nose needed to
be finer than the rest of the embroidery, so after much trial and
error we used multiple strands of the matching sewing thread to
stitch the nose instead of yarn. After finishing the embroidery on
the tapestry, we took the window screen off of the original wooden
frame and wrapped it around a piece of sturdy, thin plywood, tacking
it in place with a staple gun.
THE DOVE
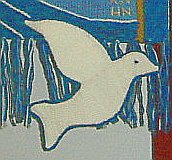 The
logo that inspired us to make our tapestry had a stylized dove
hanging off the lower right corner. When we first discussed making
the tapestry, we agreed that we would not include the dove. As we
thought about it, though, we realized that trying to make the dove
would test our ingenuity and add drama to our tapestry. We knit the
front and back simultaneously, reversing the pattern shaping so that
they would exactly match. When we blocked these pieces, we sprayed
them with starch so that they would lie stiff and flat. We cut a
piece of thin plastic from a leftover stencil in the shape of the
dove to stiffen it, painting it white so that the lines wouldn't show
through the fine white knitting. Then we sewed the two pieces of the
dove together around the plastic. We finished the seam with a blue
single crocheted edging, to match the blue outline from the logo. To
attach the dove to the tapestry, we carefully punctured a hole in the
plastic between the stitches at a point high on the wing, and
stitched through this hole to the tapestry several times.
The
logo that inspired us to make our tapestry had a stylized dove
hanging off the lower right corner. When we first discussed making
the tapestry, we agreed that we would not include the dove. As we
thought about it, though, we realized that trying to make the dove
would test our ingenuity and add drama to our tapestry. We knit the
front and back simultaneously, reversing the pattern shaping so that
they would exactly match. When we blocked these pieces, we sprayed
them with starch so that they would lie stiff and flat. We cut a
piece of thin plastic from a leftover stencil in the shape of the
dove to stiffen it, painting it white so that the lines wouldn't show
through the fine white knitting. Then we sewed the two pieces of the
dove together around the plastic. We finished the seam with a blue
single crocheted edging, to match the blue outline from the logo. To
attach the dove to the tapestry, we carefully punctured a hole in the
plastic between the stitches at a point high on the wing, and
stitched through this hole to the tapestry several times.
CONCLUSION
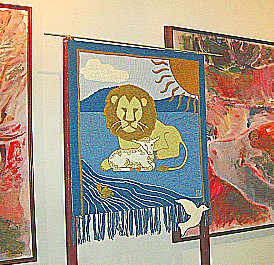 We
exhibited our tapestry at the 2005 Friends General Conference
Gathering whose logo inspired us to make our tapestry. We also showed
it at the Creative Spirit Art Center's second annual Quilts and Fiber
Arts Show. The tapestry was exciting and surprisingly easy to make.
Best of all, it didn't have to fit or flatter anyone's figure, go
with anyone's winter jacket, or even coordinate with a sofa. It was
knitting for art's sake, and there's nothing more liberating than
that. We are already planning how we will make our next tapestry,
with bolder bas relief texture and more embellishments. If,
like us, you are an experienced knitter who wants to use your
creativity and make something beautiful and different, a knitted
tapestry could be your next project!
We
exhibited our tapestry at the 2005 Friends General Conference
Gathering whose logo inspired us to make our tapestry. We also showed
it at the Creative Spirit Art Center's second annual Quilts and Fiber
Arts Show. The tapestry was exciting and surprisingly easy to make.
Best of all, it didn't have to fit or flatter anyone's figure, go
with anyone's winter jacket, or even coordinate with a sofa. It was
knitting for art's sake, and there's nothing more liberating than
that. We are already planning how we will make our next tapestry,
with bolder bas relief texture and more embellishments. If,
like us, you are an experienced knitter who wants to use your
creativity and make something beautiful and different, a knitted
tapestry could be your next project!